Pricing Labour Using Tables
In This Topic
The Pricing > Materials/Hardware page of the / Properties is used for measuring labour cost.
Labour Managers
There are three databases that manage labour pricing i.e. (1) Cost, (2) Area Rate and (3) Part Rate.

Pricing > Materials/Hardware page - Click to Expand
Using these three databases, there are four (4) ways to measure labour cost. Are you going to measure labour based on:-
- the time it takes for each part? See Tutorial 1
- the time it take to complete each task at cabinet level? See Tutorial 2
- a total labour cost per cabinet? See Tutorial 3
- the material square size of a part? See Tutorial 4
Pricing/Markups page
Ensure you have the Labour category ticked and any other required Categories.

Pricing > Pricing/Markups page - Click to Expand
For these tutorials it will be easiest if you make changes in the to override existing defaults, until you decide which Labour pricing method suits your business.
Tutorial headings are collapsible - click to hide/show.
Labour Tables
It is strongly recommended to use the Form Editor button to make changes, as it is a program designed to provide a user friendly interface for editing data in table (.qlt) files. The following are some things that you need to understand about the Table (DescCost) used for setting Labour Cost - where each Labour Type is assigned a task and an hourly Cost price for a Cabinet and/or Part.
Cabinet Labour
The DescCost table can have up to 25 rows which represent Labour Type and all 25 can be used for costing labour 'By Cabinet'.
DescCost Table and Cabinet example
As shown here, the DescCost table has 25 rows. The Floor Standard cabinet's Labour page, allows you to use any of the 25 rows (that are not blank).

Part Labour
However, only the first 12 (i.e. rows 1-12) can be used for costing labour 'By Part'.
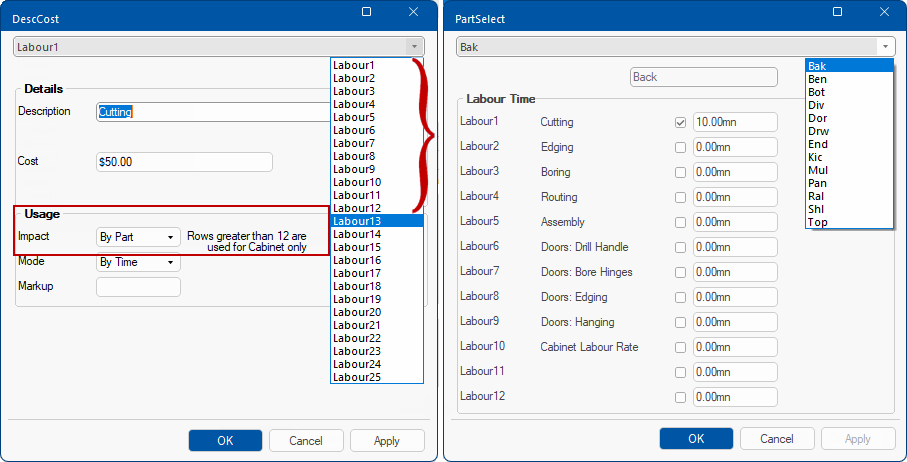
DescCost and Part Labour example
Here you can see that even though there are 25 Labour Types that can be selected from the DescCost drop list, only the first 12 can be set by Part (as discussed in Tutorial 1)
Tutorial 1: Time for Each Part
This tutorial will price labour based on the time it takes to process each part. This pricing method uses both the:-
- Labour - Cost manager, where each Labour Type is assigned a task and an hourly Cost price based on Usage.
and
- Labour - Part Rate manager, where each part is allocated a Labour Type (1-12) and an estimated processing Time.

Pricing > Materials/Hardware page - Click to Expand
Step 1 Cost by Part/Time
As stated above, there are twelve (12) Labour Types which can be described and costed individually 'By Part'.
- Open the Labour - Cost manager by clicking on the adjacent Form button.
- You will notice that there is a drop list for each Labour Type.
- As per the discussion on Tables above, rows greater than 12 are used only for Cabinet Labour costing.

Labour - Cost form - Click to view corresponding Table
Note that the Form drop lists in images are minimised for clarity. Click on above image to view the corresponding Table.
- Select Labour type from drop list.
- In this example, Labour1 which corresponds to a task to be costed.
- Description describes task being performed.
- In this example, leave as Cutting.
- To change description, simply overtype with new description.
- Enter in the hourly Cost of performing this task.
- Impact must be set to By Part as we are working at part level.
- Mode must be set to By Time, as the cost is based on time.
DescCost Form - Explanation of Fields
| Field |
Details |
| Description |
Describes the task being performed and can be amended as per user requirements by over typing. |
| Cost |
This is the per hour cost of this task.
A dollar symbol must be used with all entries e.g. if the value is 50 cents you need to enter this as $0.50 |
| Impact |
This field is used to determine whether the task is based on...
- By Cabinet i.e. utilises the data stored at cabinet level.
- By Part i.e. calculates for each part that is selected.
|
| Mode |
This field nominates what cost rate is being used...
- By Area i.e. Cost is calculated by the area.
- By Time i.e. Cost is calculated by the time (measured in minutes).
|
Step 2 Set Part Processing Time
As we are costing the time it takes for each part, we need to allocate Time taken for each Labour Type.
- Open the Labour - Part Rate by clicking on the adjacent Form button.
- You will notice that there is a drop list for each part.
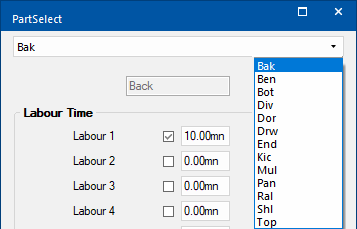
Labour - Part Rate form - Click to Expand
- Select Part from the drop list.
- In this example we will only select the back part i.e. Bak
- Tick the Use checkbox to enable required task to be costed.
- In this example tick the Labour 1 checkbox (in Step 1 this corresponded to Cutting)
- Enter estimated Time it will take.
- In this example, type in 10mn
For this tutorial we only entered Labour Time for one type but you would complete this for each of the twelve (12) Labour Types required.
CabMaster calculates the Labour price using the hourly Cost (set in Step 1 Cost manager) of processing a part, divided by 60 minutes multiplied by processing time in minutes as stated in the Part Rate manager.
Step 3 Test Result
Test the results by running a Quantities By Category report, as shown.
Since Cutting is selected for the Part called Bak, the 10.00 minute time is applied against the hourly rate (i.e. 60 minutes).
The calculation is hourly cost of $50.00 divided by 60 minutes multiplied by 10 minutes. Therefore the labour cost of this part would be $8.33
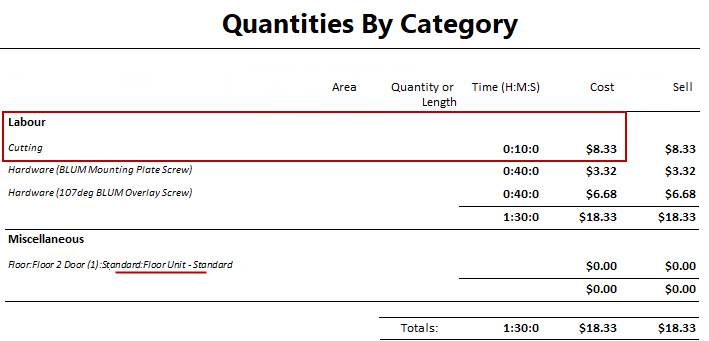
The above report shows only pricing details pertaining to this tutorial.
Rounding during the calculation process can cause amounts to increase by a few cents.
To calculate Sell price set Markup Percentages per category on the Pricing > Pricing/Markups page.
Tutorial 2 Time for Task per Cabinet
This tutorial will price labour based on the time it takes to complete each task at Cabinet level. This pricing method uses both the:-
- Labour - Cost manager, where each Labour Type is assigned a task and an hourly Cost price based on Usage

Pricing > Materials/Hardware page - Click to Expand
and selected...
- Cabinet/s are costed based on estimated time to complete each task on the Labour & Construction > Labour page.
- This can achieved on individually placed cabinets or using the .
It is strongly recommended to use the Form Editor button to make changes as it is a program designed to provide a user friendly interface for editing data in table (.qlt) files. For full discussion on Labour Managers see Pricing > Materials/Hardware page topic.
Step 1 Cost by Cabinet/Time
As stated above, there are twenty five (25) Labour Types which can be described and costed individually 'By Cabinet'.
- Open the Labour - Cost manager by clicking on the adjacent Form button.
- You will notice that there is a drop list for each Labour Type.

Labour - Cost form - Click to view corresponding Table
Note that the Form drop lists in images are minimised for clarity. Click on above image to view the corresponding Table.
- Select Labour type from drop list.
- In this example, Labour1 which corresponds to a task to be costed.
- Description describes task being performed.
- In this example, leave as Cutting.
- To change description, simply overtype with new description.
- Enter in the hourly Cost of performing this task.
- Impact must be set to By Cabinet as we are working at cabinet level.
- Mode must be set to By Time, as the cost is based on time.
DescCost Form - Explanation of Fields
| Field |
Details |
| Description |
Describes the task being performed and can be amended as per user requirements by over typing. |
| Cost |
This is the per hour cost of this task.
A dollar symbol must be used with all entries e.g. if the value is 50 cents you need to enter this as $0.50 |
| Impact |
This field is used to determine whether the task is based on...
- By Cabinet i.e. utilises the data stored at cabinet level.
- By Part i.e. calculates for each part that is selected.
|
| Mode |
This field nominates what cost rate is being used...
- By Area i.e. Cost is calculated by the area.
- By Time i.e. Cost is calculated by the time (measured in minutes).
|
Step 2 Set Task Time on Cabinet
Determine which tasks on the required cabinet are to be costed and allocate the estimated time is takes to perform each task.
- Open/Format the Cabinet and select the Labour & Construction > Labour page
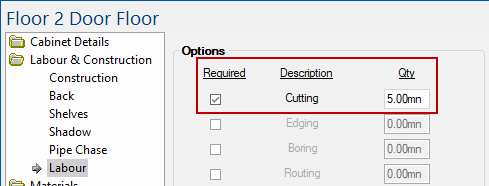
Labour & Construction > Labour page of cabinet - Click to Expand
- Tick the Use checkbox to enable required task to be costed.
- In this example tick the Cutting checkbox (in Step 1 this corresponded to Labour1)
- Enter estimated Qty of Time it will take to process this task.
- In this example, type in 5mn
For this tutorial we only entered the Cost for one type of task, Cutting, in Step 1. Therefore only this task was made available for selection (i.e. others are greyed out).
Step 3 Test Result
Test the results by running a Quantities By Category report, as shown.
Since Cutting is nominated, the 5.00 minute time is applied against the hourly rate (i.e. 60 minutes).
The calculation is hourly cost of $50.00 divided by 60 minutes multiplied by 5 minutes. Therefore the labour cost of this part would be $4.17
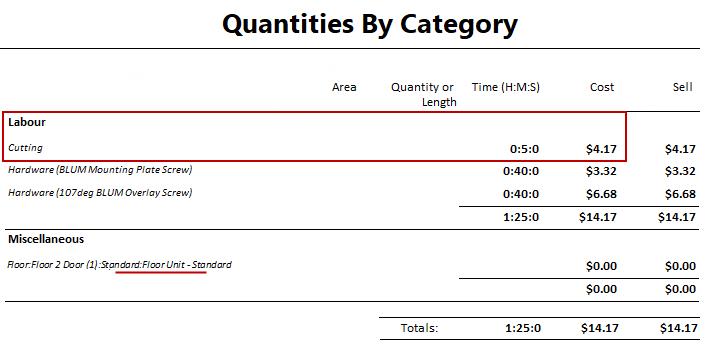
The above report shows only pricing details pertaining to this tutorial.
Rounding during the calculation process can cause amounts to increase by a few cents.
To calculate Sell price set Markup Percentages per category on the Pricing > Pricing/Markups page.
Tutorial 3 Total Cost per Cabinet
This tutorial will price labour based on the total labour cost per cabinet. This pricing method uses both the:-
- Labour - Cost manager, where each Labour Type is assigned a task and an hourly Cost price based on Usage
Pricing > Materials/Hardware page - Click to Expand
and selected...
- Cabinet/s are costed based on a labour rate on the Labour & Construction > Labour page.
It is strongly recommended to use the Form Editor button to make changes as it is a program designed to provide a user friendly interface for editing data in table (.qlt) files. For full discussion on Labour Managers see Pricing > Materials/Hardware page topic.
Step 1 Cost Cabinet by Labour Rate
As stated above, there are twenty five (25) Labour Types which can be described and costed individually 'By Cabinet'.
- Open the Labour - Cost manager by clicking on the adjacent Form button.
- You will notice that there is a drop list for each Labour Type.

Labour - Cost form - Click to view corresponding Table
Note that the Form drop lists in images are minimised for clarity. Click on above image to view the corresponding Table.
- Select Labour10 Labour type from drop list.
- Note the Description describes the task as Cabinet Labour Rate.
- Enter in the hourly Cost of performing this task.
- Impact must be set to By Cabinet as we are working at cabinet level.
- Mode must be set to By Time, as the cost is based on time.
Step 2 Set Task Time on Cabinet
Determine which tasks on the required cabinet are to be costed and allocate the estimated time is takes to perform each task.
- Open/Format the Cabinet and select the Labour & Construction > Labour page

Labour & Construction > Labour page of cabinet - Click to Expand
- Tick the Use checkbox to enable required task to be costed.
- In this example tick the Cabinet Labour Rate checkbox
- Enter estimated Qty of Time it will take to process this task.
- In this example, type in 15mn
Step 3 Test Result
Test the results by running a Quantities By Category report, as shown.
Since Cabinet Labour Rate is nominated, the 15.00 minute time is applied against the hourly rate (i.e. 60 minutes).
The calculation is hourly cost of $60.00 divided by 60 minutes multiplied by 15 minutes. Therefore the labour cost of this part would be $15.00
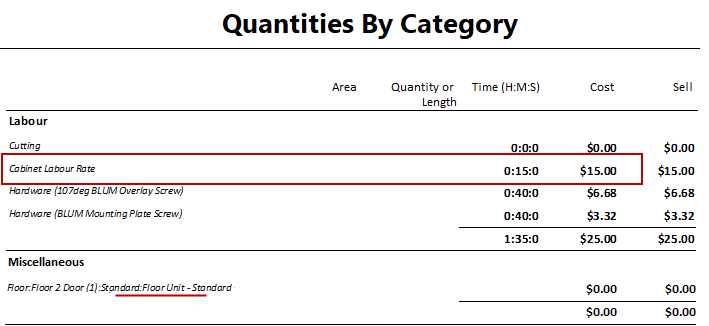
The above report shows only pricing details pertaining to this tutorial.
Rounding during the calculation process can cause amounts to increase by a few cents.
To calculate Sell price set Markup Percentages per category on the Pricing > Pricing/Markups page.
Tutorial 4 Material Size of Part
This tutorial will price labour based on the material size of each part. This pricing method uses both the:-
- Labour - Cost manager, where each Labour Type is assigned a task and an hourly Cost price based on Usage.
- Labour - Area Rate manager, where the area of the material used is assigned an estimated time.
- Labour - Part Rate manager, where each part is allocated a Labour Type (1-12) and an estimated processing Time.
Pricing > Materials/Hardware page - Click to Expand
It is strongly recommended to use the Form Editor button to make changes as it is a program designed to provide a user friendly interface for editing data in table (.qlt) files. For full discussion on Labour Managers see Pricing > Materials/Hardware page topic.
Step 1 Cost by Part/Area
As stated above, there are twelve (12) Labour Types which can be described and costed individually by 'By Part'.
- Open the Labour - Cost manager by clicking on the adjacent Form button.
- You will notice that there is a drop list for each Labour Type.

Labour - Cost form - Click to view corresponding Table
Note that the Form drop lists in images are minimised for clarity. Click on above image to view the corresponding Table.
- Select Labour type from drop list.
- In this example, Labour1 which corresponds to a task to be costed.
- Description describes task being performed.
- In this example, leave as Cutting.
- To change description, simply overtype with new description.
- Enter in the hourly Cost of performing this task.
- Impact must be set to By Part as we are working at part level.
- Mode must be set to By Area, as the cost is based on area of material.
DescCost Form - Explanation of Fields
| Field |
Details |
| Description |
Describes the task being performed and can be amended as per user requirements by over typing. |
| Cost |
This is the per hour cost of this task.
A dollar symbol must be used with all entries e.g. if the value is 50 cents you need to enter this as $0.50 |
| Impact |
This field is used to determine whether the task is based on:-
- By Cabinet i.e. utilises the data stored at cabinet level
- By Part i.e. calculates for each part that is selected.
|
| Mode |
This field nominates what cost rate is being used:-
- By Area i.e. Cost is calculated by the area
- By Time i.e. Cost is calculated by the time (measured in minutes).
|
Step 2 Set Part Processing Time
As we are costing the time it takes for each part, we need to allocate Time taken for each Labour Type.
- Open the Labour - Part Rate by clicking on the adjacent Form button.
- You will notice that there is a drop list for each part.

Labour - Part Rate form - Click to Expand
- Select Part from the drop list.
- In this example we will only select the back part i.e. Bak
- Tick the Use checkbox to enable required task to be costed.
- In this example tick the Labour 1 checkbox (in Step 1 this corresponded to Cutting)
- Enter estimated Time it will take.
- In this example, type in 10mn
For this tutorial we only entered Labour Time for one type but you would complete this for each of the twelve (12) Labour Types required.
Step 3 Set Time per Material Area
We need to assign an estimated Time taken to process an Area (sqm) of the material used. This manager needs to reflect increases in the time taken if the dimensions of a cabinet are amended, ensuring that the Labour price will adjust accordingly.
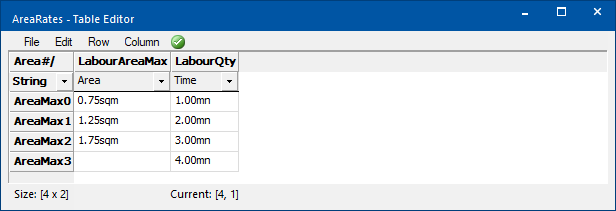
Area Rate Table - Explanation
CabMaster checks the area calculated against the Area Rate table. In the example below, if:-
- Area > 0.00 sqm but ≤ 0.75 sqm then the processing time is calculated as 1.00mn
- Area > 0.75 sqm but ≤ 1.25 sqm then the processing time is calculated as 2.00mn
- Area > 1.25 sqm but ≤ 1.75 sqm then the processing time is calculated as 3.00mn
- AreaMax3 has been left blank which means that anything > 1.75 sqm will be calculated as 4.00mn
We will assume that the Area Manager needs amending. The drop section above explains what we want to achieve and why.
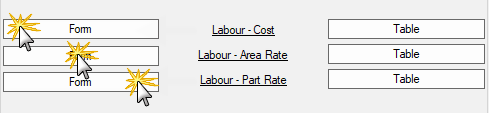
- Open the Labour - Area Rate manager by clicking on the adjacent Form button.
- You will notice that there is a drop list for area.

Labour - Area Rate form - Click to view corresponding table
- Select Area type from the drop list.
- In this example we will only select AreaMax1
- Enter the material volume Area (Max).
- In this example, type in 1.25sqm
- Enter estimated Time it will take.
- In this example, type in 2.00mn
Step 4 Test Result
In this test we have placed a Floor 2 Door with a width of 1200mm. The Cabinet Information shows that the Back is 0.730m x 1.2m = 0.876 sqm
CabMaster checks this against the Area Rate table (click on above image).

Cabinet Properties
Test the results by running a Quantities By Category report, as shown.
Since the Part called Bak is 0.876sqm which is greater than 0.75sqm and not greater than 1.25sqm the table references the time required 2.00 minutes and then applies this to the hourly rate.
The calculation is hourly cost of $50.00 divided by 60 minutes multiplied by 2 minutes. Therefore the labour cost of this part would be $1.67
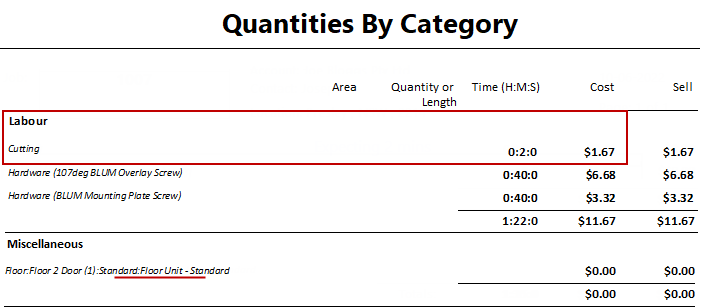
The above report shows only pricing details pertaining to this tutorial.
Rounding during the calculation process can cause amounts to increase by a few cents.
To calculate Sell price set Markup Percentages per category on the Pricing > Pricing/Markups page.
See Also